Antigravity IDE Vibe Coding Build SaaS App: Step-by-Step Guide
Published: 9 Oct 2026
What if you could have a SaaS idea today and start turning it into a working app without spending hours writing every line of code yourself? This is where Antigravity IDE vibe coding build SaaS app workflows become interesting. Instead of treating coding as a long list of technical tasks, you can describe what you want, let AI help build the parts, and then guide the project as it grows.
But there is a catch. Telling an AI to “build my SaaS” does not automatically create a reliable product. You still need a clear idea, a simple plan, good prompts, testing, and basic security checks. The better you guide the development process, the easier it becomes to turn a rough concept into something people can actually use.
In this guide, I’ll walk through the process step by step, from planning your SaaS and setting up the project to building features, fixing errors, testing the app, and getting it ready for launch. Whether you are new to coding or simply want to speed up development, you will see how this approach can make SaaS building more practical and approachable.
What Is Antigravity IDE Vibe Coding?
If you are new to AI-assisted development, the term Antigravity IDE vibe coding may sound more complicated than it really is. The basic idea is simple: instead of writing every instruction manually in code, you describe what you want to build in natural language and use the AI inside the development environment to help turn that idea into code.
For example, imagine you want to make a small subscription app. You could explain the pages, login system, dashboard, and main feature you want. The AI can then help create the code, suggest changes, and work through problems as you continue developing the project.
How the Approach Works
The process usually looks like this:
- Describe the idea: Tell the IDE what you want the application to do.
- Create the structure: Ask it to set up the required files and basic project layout.
- Build feature by feature: Add important functions one at a time instead of requesting the entire product together.
- Review the output: Check the generated code and test each feature.
- Improve the result: Give clear follow-up instructions when something needs to change.
This approach is especially useful for people exploring Vibe coding with Antigravity IDE because it makes the first stages of development more approachable. You still need to understand what your app should do, but you do not have to manually write every part from scratch.
The important point is that vibe coding does not remove the need for development skills. AI can generate code quickly, but you still need to guide it, check its work, fix errors, and make decisions about your product.
Why Use Antigravity IDE to Build a SaaS App?
Building a SaaS product usually involves many small jobs, from creating the interface to connecting a database and fixing errors. AI-assisted development can make these tasks easier to manage, especially when you want to move from an idea to a working prototype without writing every part manually.
If you want to build a SaaS app with Antigravity IDE, the main benefit is the way you can communicate with the development environment. You can explain a feature in plain language, review what is created, and then ask for changes as your project takes shape.
Where It Can Help
- Faster prototyping: Turn a basic product idea into an early working version more quickly.
- Less repetitive coding: Let AI handle routine code while you focus on the product.
- Easy feature changes: Describe what needs to change instead of rewriting every related part yourself.
- Better experimentation: Try different layouts, workflows, and features before settling on a final version.
- Useful for beginners: People with limited coding experience can explore development through natural-language instructions.
- Step-by-step development: Build one feature, test it, and then move to the next instead of creating everything at once.
For example, you could start with a simple dashboard, then add login, user profiles, database storage, and payments one feature at a time. This makes Antigravity IDE SaaS development easier to control because you can test each part before adding more complexity.
The biggest advantage is not simply speed. It is the ability to stay involved in the building process while AI helps with the technical work. You still need to review the code, test the app, and make sure the final product works as intended.
What You Need Before You Start
Before you start building, take a few minutes to decide what your SaaS should actually do. A clear starting plan makes AI-assisted development much easier because the IDE has a specific goal to follow instead of trying to guess your entire product.
You do not need a perfect business plan at this stage. You only need enough information to explain the product clearly and decide what should be built first.
Prepare These Basics
- A clear SaaS idea: Write one simple sentence explaining the problem your product will solve.
- Target users: Decide who will use the app, such as freelancers, students, agencies, or small businesses.
- Core features: List only the functions users need to get the main benefit from your product.
- Basic user flow: Think about what happens from signup to the main action and final result.
- Development setup: Have your coding environment, required accounts, and project tools ready.
- Database plan: Decide what information your app needs to store, such as users, projects, orders, or subscriptions.
- Hosting plan: Choose where the finished application will run once it is ready.
- Testing plan: Decide how you will check each feature before making the app public.
For example, if you want to create an invoice SaaS, your first version might only need user signup, invoice creation, customer details, PDF export, and a simple dashboard. You can add advanced features later.
Plan Your SaaS App Before Coding
A clear plan gives your AI a better direction. Before you start creating a SaaS app with Antigravity IDE, decide what the first version must do and leave extra features for later. This keeps the project smaller and makes each development step easier to test.
Start With the MVP
Your MVP is the simplest version of your product that solves the main user problem. Write down the core journey first, then remove anything that is not essential for the first launch.
Focus on:
- Main problem: What does your SaaS help users solve?
- Target user: Who will use it?
- Core action: What is the main thing users come to do?
- Required screens: Which pages are needed for that action?
- User flow: What happens from signup to getting the result?
- Future features: Which ideas can wait until later?
Quick tip: Write your MVP plan before opening the IDE. A smaller, clear product is much easier to build, test, and improve than a large idea with no defined starting point.
Set Up Your Antigravity IDE Project
Once your SaaS idea is clear, the next step is to prepare the development workspace. A clean setup gives the AI a clear place to work and reduces confusion when you start adding features. This is where Antigravity IDE for SaaS development can become useful for turning your plan into an organized project.
Create a Clean Starting Point
Do not begin by asking the AI to build the entire application in one request. Start with the basic project and give it enough information to understand what you are creating.
Work through these steps:
- Create the project: Start a new workspace for your SaaS idea.
- Choose the stack: Decide which programming language, framework, and database you want to use.
- Set the folder structure: Keep files organized from the beginning.
- Add the project goal: Explain what the application does and who will use it.
- Share the feature list: Give the AI the core functions you planned for the MVP.
- Set coding rules: Tell it how you want the code organized and named.
- Build a small test: Ask the AI to create one simple part first and check that it works.
For example, if you are creating a task-management SaaS, begin with the basic application structure and homepage. After confirming that it runs correctly, move to authentication, tasks, user accounts, and other features.
This step-by-step approach makes Antigravity IDE app development easier to manage. You can spot problems early instead of trying to find one error inside hundreds of lines of generated code.
Quick tip: Give the IDE context before giving it complex tasks. A clear project brief can save you from many unnecessary fixes later.
Build the SaaS App Step by Step
Now that your project is ready, it is time to turn the plan into a working product. The easiest approach is to build one part at a time instead of asking the AI to create the whole SaaS in a single prompt.
This gives you more control and makes it easier to find and fix problems as you move forward.
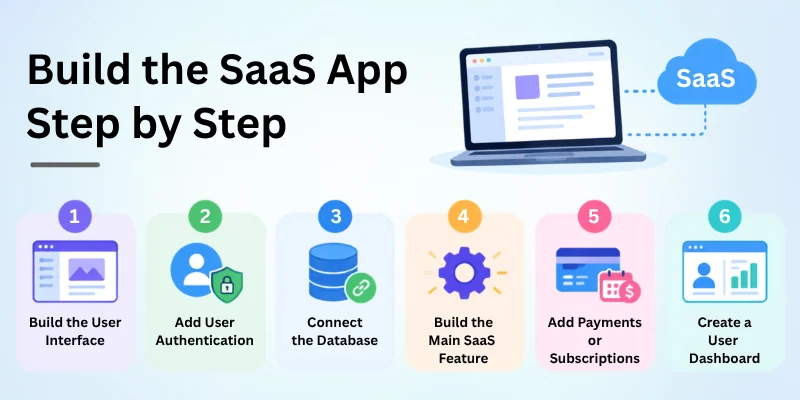
Steps to Build the App
- Create the Basic App Structure
- Build the User Interface
- Add User Authentication
- Connect the Database
- Build the Main SaaS Feature
- Add Payments or Subscriptions
- Create a User Dashboard
Let’s check in more detail on the steps:
1. Create the Basic App Structure
Start with the foundation of your application. Tell Antigravity what type of SaaS you are building and ask it to create the basic files, folders, routes, and starting pages.
Keep the first request simple:
- Define the project structure
- Set up the main application route
- Create the homepage
- Add basic navigation
- Make sure the project runs without errors
Once the first version opens correctly, check the structure before adding more code. If something is wrong, fix it now rather than building new features on top of a broken foundation.
2. Build the User Interface
After the foundation works, create the screens users will actually see. Give the AI a clear description of each page and explain how users should move between them.
Start with the important parts:
- Homepage or landing page
- Signup and login screens
- Main application area
- Navigation menu
- Buttons and input fields
- Mobile-friendly layout
For example, if your SaaS helps users create invoices, the interface could include a landing page, login screen, invoice form, and preview area.
Do not try to perfect every visual detail immediately. First make the screens work properly. You can improve spacing, colors, fonts, and other design details after the main flow is working.
3. Add User Authentication
Once the interface is ready, users need a safe way to create accounts and access their own data. This is where authentication becomes an important part of Antigravity IDE web app development.
Ask Antigravity to build the login flow around your chosen authentication method. Keep the request focused and test each part before moving ahead.
The process can include:
- Create signup and login pages
- Add password or supported sign-in methods
- Validate user information
- Protect private pages
- Add logout functionality
- Show useful messages when login fails
For example, a project-management SaaS should allow each user to sign in and see only their own projects. After creating the authentication flow, test successful login, incorrect passwords, logout, and access to protected pages.
4. Connect the Database
Your SaaS needs somewhere to store information. A database can hold user profiles, projects, payments, settings, or other records required by your application.
When you create SaaS using Antigravity IDE, tell the AI exactly what information your database needs to store. Then build the connection gradually.
Start by:
- Choosing your database
- Creating the required tables or collections
- Defining important fields
- Connecting the application to the database
- Testing data creation and retrieval
- Checking that users can access only their own records
For instance, an invoice platform might store customers, invoices, items, and payment status. Test each database action before adding another feature.
5. Build the Main SaaS Feature
Now it is time to create the feature that gives your product its real value. This is the part users will come to your application to use, so keep your instructions specific and build the function in small pieces.
When you build a SaaS application with Antigravity, follow this order:
- Define what the feature should do
- Create the required input fields
- Build the result or output area
- Connect the needed API or service
- Add basic error handling
- Test different user inputs
- Improve the feature after testing
Do not add advanced options before the main function works. A simple feature that works reliably is more useful than a large feature full of bugs.
6. Add Payments or Subscriptions
If your SaaS will make money through paid plans, add billing after the core product works. Decide what users get with each plan before asking the AI to build the payment flow.
Your setup may include:
- Free and paid plans
- Subscription checkout
- Payment confirmation
- Plan-based feature limits
- Subscription status
- Upgrade and downgrade options
- Cancellation handling
Test successful payments, failed payments, cancelled subscriptions, and plan changes before launch. Payment logic handles real money, so never trust AI-generated code without reviewing and testing it carefully.
7. Create a User Dashboard
The dashboard becomes the main working area of your SaaS after users sign in. It should show the information and actions they need without making them search through different pages. When you build a SaaS app using vibe coding, describe the dashboard layout clearly so Antigravity can build it around your actual user flow.
Start with the most useful information and actions:
- User overview: Show the account name, plan, or other basic details.
- Main activity: Display recent projects, tasks, files, or results.
- Quick actions: Add buttons for the most common tasks.
- Usage details: Show limits, credits, or subscription usage when needed.
- Navigation: Give users simple access to important areas.
- Account settings: Include profile, password, billing, and other account options.
After creating it, test the dashboard with different account types. Make sure free users see the correct limits and paid users get the features included in their plan.
Use Vibe Coding Prompts Effectively
The quality of your prompt can change the quality of the code you receive. A vague request gives the AI too much room to guess, while a clear request tells it exactly what you want to build. This is why good prompts are an important part of Antigravity vibe coding SaaS projects.
You do not need to write complicated technical instructions. Give the AI enough context about the feature, explain the expected result, and work through the task in smaller steps.
A Simple Prompt Structure
Use this basic pattern when asking Antigravity to build a feature:
- Explain the goal: Tell it what you want the feature to achieve.
- Describe the user: Explain who will use it.
- List the required actions: Mention what users should be able to do.
- Set the design needs: Describe the layout or important interface elements.
- Mention technical limits: Include any framework, database, API, or security requirements.
- Define the expected result: Tell it what should happen when the feature works correctly.
For example, instead of saying, “Build a dashboard,” give a clearer request such as: “Create a responsive dashboard where logged-in users can view their projects, create a new project, check their monthly usage, and open account settings.”
Build Through Small Requests
Avoid asking for ten major features in one prompt. Start with one function, check the result, and then continue.
A practical sequence could be:
- Create the dashboard layout
- Add project creation
- Connect saved projects
- Add usage tracking
- Add account settings
This approach makes Vibe code a SaaS app with Antigravity easier to manage because you can identify exactly which request caused a problem.
Quick tip: Treat every prompt like a small development task. Clear instructions, one feature at a time, usually give you better control over the final application.
Test and Fix Your SaaS App
Before launching your product, test every important part of the application. AI can help you build features quickly, but testing shows whether those features actually work for real users.
- Check the main user flow: Start from signup and follow the complete journey until the user gets the expected result.
- Test every feature: Open each function separately and confirm that buttons, forms, pages, and actions work correctly.
- Try incorrect inputs: Enter missing details, invalid information, or unexpected values to see how the app responds.
- Check error messages: Make sure errors are clear enough for users to understand what went wrong.
- Test user permissions: Confirm that one user cannot view or change another user’s private information.
- Check mobile responsiveness: Open the application on different screen sizes and fix layouts that look broken.
- Test API connections: Check whether external services respond correctly and handle failures properly.
- Review database actions: Make sure information is saved, updated, and deleted correctly.
- Check payments: Test successful payments, failed transactions, cancellations, and plan changes if your SaaS uses subscriptions.
- Fix one problem at a time: Give Antigravity the exact error, expected result, and affected feature instead of asking it to repair the whole application.
After every fix, run the same test again. This simple habit helps you catch new problems before they affect your users.
Final Thoughts
Building a SaaS with AI can feel much easier when you stop thinking about the whole product at once. With Antigravity IDE vibe coding to build SaaS app, you can break a large idea into smaller tasks, guide the AI through each stage, and test the result as you go. The key is not to let AI make every decision for you. Your product idea, planning, testing, and final choices still matter.
In my view, Antigravity can be a useful option for creators who want to move from an early concept to a working SaaS without handling every coding task manually. Start with a simple MVP, give clear prompts, build one feature at a time, and check everything before launch.
Have a SaaS idea you have been putting off? Start with one simple feature today, build it with Antigravity, test what you create, and take your first step toward turning that idea into a real product.
Frequently Asked Questions
Building a SaaS with AI can bring up practical questions, especially if you are new to vibe coding. Here are 10 common questions that cover the parts creators usually want to understand before starting.
Yes, beginners can use natural-language prompts to get help with many development tasks. However, basic coding knowledge still helps you understand errors, review generated code, and make better decisions.
You do not need to know everything before starting. Learn as you build and test each feature carefully.
It can be useful for turning product ideas into working prototypes and helping with coding tasks. Its value depends on how clearly you explain your requirements and how carefully you review the output.
For a serious product, testing and human review still matter.
Start with a small MVP rather than requesting the complete application in one prompt. Define the main problem, users, core feature, required pages, and basic user flow first.
Then build the project in small stages and test each part before moving forward.
Yes. Build SaaS app using vibe coding by describing features in plain language and letting the AI help generate or modify the required code.
The best results come from smaller prompts, clear requirements, regular testing, and careful review of AI-generated changes.
You can use it for many web-based product ideas, such as:
- AI writing platforms
- Task management tools
- Invoice systems
- Booking applications
- Customer dashboards
- Analytics products
Your chosen technology stack and external services will determine what the final product can support.
Yes, you can build subscription features with the right payment service and backend setup. You need to handle checkout, subscription status, plan limits, cancellations, and payment events correctly.
Because billing involves real money, test the complete flow before allowing customers to pay.
Antigravity IDE web app development can help with tasks such as creating interface components, connecting application logic, fixing errors, and working with APIs.
You still need to decide how the application should behave. AI assists with implementation, but you remain responsible for checking the result.
Not by itself. Vibe coding SaaS app development can speed up the building stage, but a launch-ready product also needs testing, security checks, performance review, user feedback, and reliable hosting.
A prototype can be created quickly, but turning it into a dependable product requires more work.
One common mistake is giving the AI a huge request and accepting the result without checking it. Smaller tasks make problems easier to find and correct.
Keep backups, test changes regularly, and understand important parts of the code before putting the application into production.
Yes, a solo creator can use AI assistance to handle many development tasks. Antigravity IDE for building SaaS apps can be especially helpful when you want to prototype an idea and gradually add features.
My advice is simple: start small, keep your project organized, and treat AI as a development assistant rather than a replacement for your own judgment.





- Be Respectful
- Stay Relevant
- Stay Positive
- True Feedback
- Encourage Discussion
- Avoid Spamming
- No Fake News
- Don't Copy-Paste
- No Personal Attacks
- Be Respectful
- Stay Relevant
- Stay Positive
- True Feedback
- Encourage Discussion
- Avoid Spamming
- No Fake News
- Don't Copy-Paste
- No Personal Attacks
